8 Reasons Why the Engine Oil Cap Won’t Come Off
Maintaining your vehicle’s engine is essential to ensure optimal performance and longevity. Regularly checking and changing the engine oil is a crucial part of this maintenance routine. However, there might be instances when you find it challenging to remove the engine oil cap, which can be frustrating. In this article, we will explore eight common reasons why the engine oil cap won’t come off and how to address them.
1. Pressure Buildup
One of the primary reasons the engine oil cap might be difficult to remove is pressure buildup within the engine. As the engine runs, it generates heat, causing the oil to expand and create pressure. If you attempt to open the oil cap immediately after running the engine, this pressure can make it challenging to unscrew the cap. To combat this, allow the engine to cool down for a sufficient period before attempting to remove the oil cap.
2. Cross-Threaded Cap
A cross-threaded oil cap can be a significant obstacle. When the cap is not aligned correctly with the threads on the oil filler neck, it can become stuck and challenging to remove. If you suspect the cap is cross-threaded, avoid forcing it open, as this may damage the threads. Instead, gently attempt to realign the cap by turning it counterclockwise and then clockwise until it properly seats.
3. Accidental Over-tightening
Sometimes, well-intentioned individuals might accidentally over-tighten the engine oil cap during the oil-changing process. While ensuring a snug fit is essential, excessive tightening can make it difficult to remove the cap later. To prevent this issue, tighten the cap firmly but avoid using excessive force. If the cap is over-tightened, use an oil filter wrench or a similar tool to assist in loosening it.
4. Corrosion or Rust
Over time, exposure to moisture and other elements can cause corrosion or rust to develop on the oil cap and its threads. This corrosion can seize the cap in place, making it hard to unscrew. Regular cleaning and lubrication of the oil cap and threads can help prevent this issue. If the cap is already corroded, using penetrating oil and gently tapping it can aid in loosening the cap.
5. Debris and Dirt Buildup
Another common issue is the accumulation of debris and dirt around the oil cap, especially if the engine is not cleaned regularly. This buildup can create a seal, making it challenging to remove the cap. Thoroughly clean the area around the cap and use a clean cloth to remove any dirt or grime. Applying a degreaser can also help in loosening the accumulated debris.
6. Damaged or Worn Threads
Worn or damaged threads on either the oil cap or the filler neck can cause difficulty in removing the cap. Inspect the cap and the filler neck for signs of wear, cross-threading, or other damages. If you notice any issues, consider replacing the oil cap or seeking professional assistance to address the problem.
7. Material Expansion and Contraction
Extreme temperature variations can cause materials to expand and contract, affecting the fit of the oil cap. If the vehicle was recently exposed to high temperatures, the cap and the filler neck may have expanded, causing a tighter seal. Conversely, cold temperatures can contract the materials, making it harder to unscrew the cap. Wait for the engine to reach a moderate temperature before removing the cap.

8. Manufacturing Defects
In rare cases, a manufacturing defect in the oil cap itself can be the reason for its difficulty in removal. The threads may not have been properly machined, or there could be an irregularity in the cap’s design. If the vehicle is still under warranty, reach out to the manufacturer or dealer to address this issue.
How to Remove the Engine Oil Cap
Removing the engine oil cap is a simple yet crucial step in checking and changing the engine oil. Here’s a step-by-step guide to help you do it correctly:
Ensure Safety First: Before attempting to remove the engine oil cap, make sure the engine is turned off, and the vehicle is parked on a level surface. Additionally, allow the engine to cool down, especially if it has been recently running.
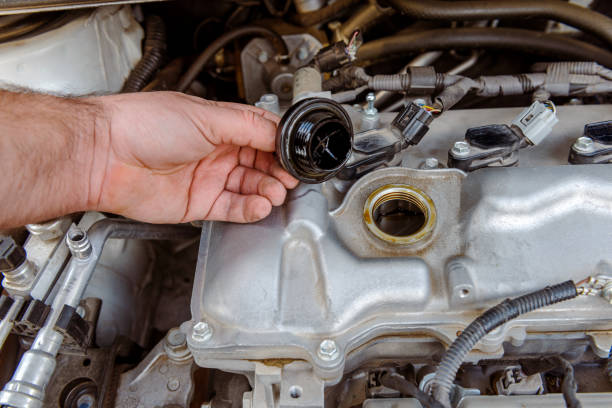
Locate the Oil Cap: The engine oil cap is typically located on the top of the engine and is often labeled with the words “Engine Oil” or a symbol resembling an oil can.
Inspect the Cap: Check the cap for any signs of damage or excessive wear. If you notice significant damage, it’s advisable to replace the cap before proceeding.
Position Yourself Comfortably: Position yourself in a way that allows you to comfortably reach the engine oil cap. Ensure you have a good grip and leverage to turn the cap.
Turn the Cap: Grip the oil cap firmly and turn it counterclockwise (lefty loosey) to unscrew it. Apply steady and even pressure, but avoid using excessive force, especially if the cap seems stuck.
Be Patient and Gentle: If the cap is difficult to turn, do not force it. Apply a bit of patience and gentle wiggling to help loosen any potential sticking points.
Check for Seals and Gaskets: As you remove the cap, check for any seals or gaskets attached to it. Ensure these are in good condition and properly seated.
Inspect the Oil Cap: Take a moment to inspect the inside of the oil cap for any sludge, debris, or discoloration. Clean the cap if necessary.
What Are The Various Tools You Can Use To Remove The Oil Cap Easily?
Removing the oil lid from an engine is a simple task, for which you do not normally need a special tool. However, if the lid is stuck or difficult to remove due to leaks or oil residues, you may use some tools to facilitate the process. Here are some tools you can consider:
Rubber glass opener:
A rubber opener is well in your hand and helps you to turn and open the oil lid without slipping. The rubber material increases the friction so that the lid can be turned more easily.
Oil filter pliers:
Oil filter pliers are suitable for grabbing and turning various shapes, including oil caps. Their adjustable clamping jaws adapt to different sizes and provide a firm grip that makes it easier to lose weight.
Adjustable wrench:
An adjustable wrench can be used to loosen and remove the oil lid. Be sure to use the correct size to avoid damaging the lid or surrounding components.
Oil filter pliers:
Similar to oil filter pliers, an oil filter key is specifically designed for the removal of oil filters. Some models can also be used to grab and rotate the oil lid. Choose a type that suits your particular shutter design.
Belt wrench:
A band key is a versatile tool that can be used for various tasks, including loosening stuck lids. It has a flexible band that adapts to the size of the buckle and provides a secure grip without damaging the surface.
Flaps or gloves:
Sometimes your hands may slip due to oil. The use of a cloth or the wearing of gloves provides a better grip and facilitates the turning of the oil seal.
Sewer clamp:
Pliers with channel locks, also known as groove and spring pliers, can be adapted to the oil lid and provide an additional leverage effect when turning.
Hot air pistol or hair dryer:
If the oil lid is stuck due to thick oil or residue, the careful heating of the area around the lid with a hot air gun or a hair dryer can help to release the oil and facilitate opening.
Conclusion:
Encountering difficulty when trying to remove the engine oil cap can be frustrating, but understanding these common reasons and applying the appropriate solutions can help alleviate the problem. Regular maintenance, proper handling during oil changes, and a keen eye for potential issues can ensure a smooth oil cap operation and a well-maintained engine.
Frequently Asked Questions
1. What to do if your oil cap won’t come off?
If your oil cap is stuck, you can follow these steps to address the issue:
- Ensure the engine is cool: It’s important to wait until the engine has cooled down before attempting to remove the oil cap.
- Use proper tools: Consider using a strap wrench or oil filter pliers to gain a better grip on the cap.
- Apply gentle force: Carefully turn the cap counterclockwise to loosen it. Avoid using excessive force, as this could damage the cap or the threads on the oil filler neck.
- Lubrication: Applying a small amount of penetrating oil or lubricant around the cap’s threads can help loosen it.
2. What can cause the oil cap to come off?
The oil cap coming off is usually not an issue, but sometimes it can happen due to:
- Loose or damaged threads: If the threads on the cap or the oil filler neck are worn or damaged, they may not stay securely in place.
- Over-tightening: If the oil cap is overtightened, it can make it difficult to remove in the future.
- Debris and contaminants: Dirt or debris in the threads can make it challenging to unscrew the cap.
3. Should there be pressure when removing the oil cap?
There should not be pressure when removing the oil cap. To avoid pressure:
- Ensure the engine is cold: The vehicle should not have been running recently to allow the oil system to depressurize.
- Remove slowly: Turn the cap slowly to release any remaining pressure. If you encounter significant pressure, it may indicate other issues, and you should consult a mechanic.
4. Can leaving the oil cap off damage the engine:
Yes, leaving the oil cap off can potentially damage the engine. The oil cap is essential for maintaining proper lubrication and sealing the engine. Without it, contaminants such as dust, dirt, and moisture can enter the engine, leading to increased wear and potential damage over time. It’s crucial to replace the oil cap promptly if it’s missing or damaged to protect the engine’s health.